- Download the latest version of OpenVPN Connect for your computer’s operating system at the following URL.
https://openvpn.net/client/
NOTE: If the URL for OpenVPN Connect has changed, you may search online to find the new URL or obtain the installation file for OpenVPN Connect by accessing the following Google Drive location on the admin account.
(Windows) My Drive>Information Technology (IT)>openvpn-connect-3.7.3.4351_signed.msi
(MacOS) My Drive>Information Technology (IT)>openvpn-connect-3.7.1.5558_signed.dmg
- Install the OpenVPN Connect software by running the installer file that was downloaded in Step 1.
- Obtain the Grace Fellowship LAN OpenVPN profile from someone with access to the admin@churchreidsville.org Google Drive Account. The file for the profile is in the following folder:
My Drive>Information Technology (IT)>Grace Fellowship LAN.ovpn
NOTE: If the file has moved, search the entirety of the admin account Google Drive for “.ovpn”. If the file is still available, it will show up in the search results.
- Launch OpenVPN connect on your computer.
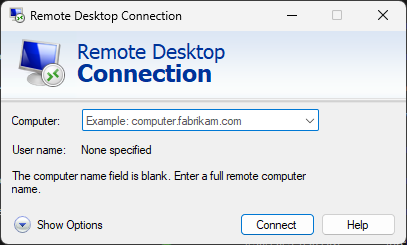
- The first time you launch OpenVPN connect, it will say “Get connected” at the top of the window. By default, it is on the URL tab. To access the Grace Fellowship LAN, click into the “Upload File” tab.
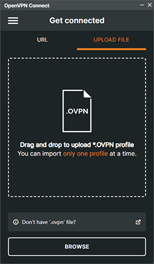
- Using the .ovpn file obtained in step 3, either drag and drop the .ovpn file into the outlined box or click the “Browse” button at the bottom of the window and navigate to the .ovpn file on your computer and open it. Both the drag and drop method and the browse method will load the predefined settings for accessing the church’s LAN via VPN.
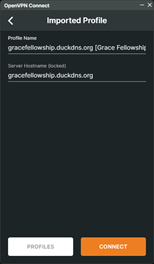
- Once the .ovpn file is loaded, OpenVPN Connect will show you the setting that have been loaded from the file. You may rename the profile to anything you want using the “Profile Name” field. The “Server Hostname” field is not editable but should show gracefellowship.duckdns.org.
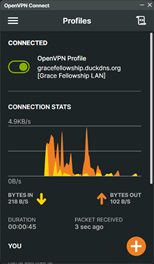
- Once you have confirmed the server hostname is correct, click the connect button to connect to the church LAN for the first time. If the settings were correct and the connection is successful, the slider button will show green, and you will start to see TX and RX performance statistics accompanied by a graph.
NOTE: If the church is experiencing a power outage or an internet outage, you will be unable to connect via VPN.
- You are now connected to Grace Fellowship’s LAN via VPN.
NOTE: Steps 10 to 13 provide instructions for disconnecting from the church’s LAN.
NOTE: Steps 14 to 17 provide instructions for reconnecting to the church LAN for subsequent connections.
NOTE: Steps 18 to 49 provide instructions for editing the slides on the digital sign.
- To disconnect the OpenVPN connection to the church LAN, click the green slider button.
- You will be given a confirmation window asking you to confirm your request to disconnect from the church’s LAN. Click the “Confirm” button.
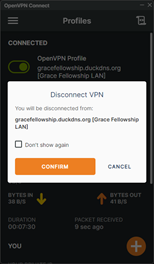
- Once you confirm to disconnect, the slider button will turn gray, and the window will say disconnected above the slider button.
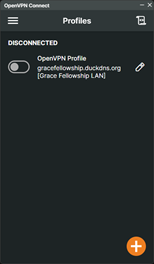
- You have successfully disconnected from Grace Fellowship’s LAN. You may close OpenVPN connect.
NOTE: To reconnect to the church LAN, follow steps 14 to 17 for subsequent connections.
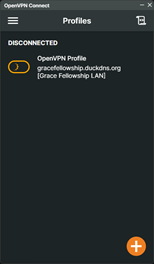
- Launch OpenVPN Connect on your computer.
- Click the gray slider button next to the Grace Fellowship LAN profile.

- While trying to connect, the slider will turn orange and show a spinning icon indicating that it is processing the connection request. It may take a few moments to connect.
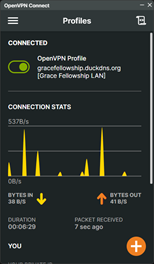
- Once the connection is successful, the OpenVPN Connect window will show connection statistics as shown and described in step 8.
NOTE: Steps 10 to 13 provide instructions for disconnecting from the church’s LAN.
NOTE: Steps 14 to 17 provide instructions for reconnecting to the church LAN for subsequent connections.
NOTE: Steps 18 to 49 provide instructions for editing the slides on the digital sign.
NOTE: Steps 18 to 49 must be completed while connected to the church’s LAN. You may connect via VPN as described in steps 14 to 17 or you may physically be within the church building and on a computer connected to the church Wi-Fi or wired LAN. If you are physically in the church and connected to the network, you do not need to follow steps 14 to 17 to connect to the church VPN. You may proceed with these steps.
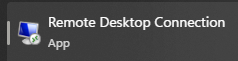
- Lauch Remote Desktop Connection (RDC) on your Windows PC.
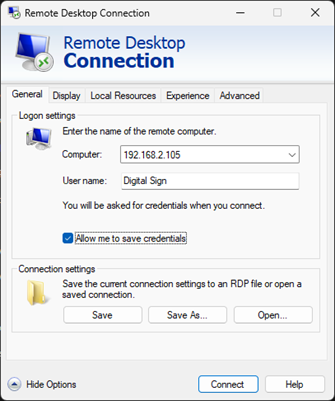
- Click the dropdown arrow next to “Show Options” to show additional options for connecting.
- In the RDC window, fill out the following fields with the following information.
Computer: 192.168.2.175
User name: Digital Sign
If you would like to save these settings and create a shortcut so you don’t have to enter this info every time, check the box that says “Allow me to save credentials”. Once checked, click Save As… to save an .rdp file to your computer. You may place the resultant file anywhere that is convenient on the computer. Once saved, you will be back at the RDC window.
NOTE: The computer used to control the digital sign has an IP address reservation within the router’s DHCP server. This address should not change unless the network router is changed.
NOTE: There are additional settings you may configure for the remote desktop connection in the other tabs (Display, Local Resources, Experience, Advanced). You may configure these as you wish. However, you must configure the settings in the other tabs prior to saving the .rdp file or your settings will not be saved. If you save your .rdp file before configuring the other tabs, you may Save As again and overwrite your original .rdp file.
- Click the connect button at the bottom of the window. If this is your first time accessing the computer or if you have chosen in the past not to save credentials via the checkbox, a new window will pop up asking you to enter the password for the machine. Enter the password to continue.
Password: Grace2024!
- Upon successful entry of the password, the remote desktop will start to connect. If the digital sign PC recently restarted or recovered from a power failure, it may take up to three minutes for the remote desktop to load. Otherwise, it should connect quickly. The sign controller software, ViPlex Express, will launch automatically or will already be open.
NOTE: ViPlex Express requires administrator privileges to run. If you are accessing the computer after it has restarted or recovered from a power failure, the computer will launch ViPlex Express and you will have to allow the software to run via a prompt asking for admin permission. The software is unsigned – the computer will flag the software as a security risk, but you are okay to proceed and approve the permission request.
NOTE: The computer is set to automatically turn on after a power failure and subsequent power recovery. If the church has power, the computer should be accessible (assuming there isn’t an internet outage).
- Once ViPlex Express is open, there will be three main tabs at the top of the window labeled Screens, Solutions, Schedule, and Control.
NOTE: If ViPlex Express was launched during login, it will automatically go to the Screens tab. If the software was already open, it may be on the Screens tab or it may be on one of the other tabs.
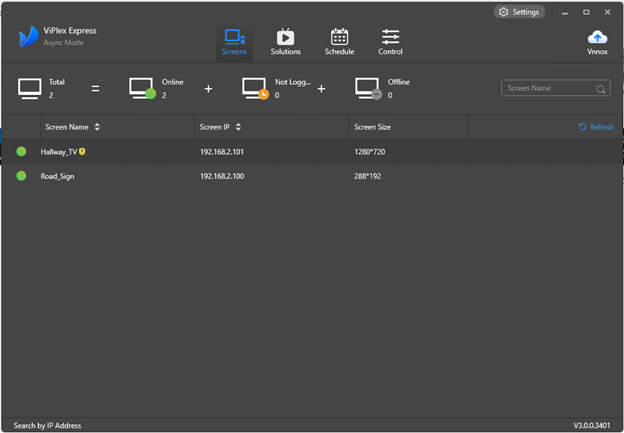
NOTE: The Screens tab will show you the available signs. There are two options at the time of writing. The Hallway_TV is the TV mounted above the bulletin board outside the church office. The Road_Sign is the digital sign at the road. Both hardware sign controllers are connected via hardwired ethernet. If the dot next to the signs are green, it means the controller software on the computer is connected to the hardware sign controller. If either of the dots is yellow, hovering over the row will reveal a button on the right side of the row that says “Connect”. Clicking that button will reconnect the sign. No password should be required as that is saved within the ViPlex Express software.
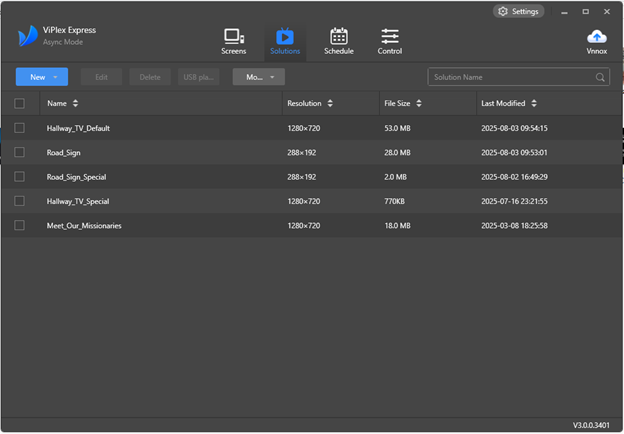
- To edit the slides for either sign, click on the Solutions tab at the top of the window. Solutions are what ViPlex Express uses to describe slideshows. At the time of writing, there are five different solutions.
Hallway_TV_Default is the solution used when general info is shown on the hallway TV such as upcoming church events (both public and private) and church announcements.
Road_Sign is the default solution for the road sign and is used to show general info about the church and upcoming public events.
Road_Sign_Special is the solution used when special slides have been created for special events, holidays, or other occasions. There are typically only one or two slides contained within this solution.
Hallway_TV_Special is the solution used to show slides for special events and specific announcements. There are typically only one or two slides contained within this solution.
Meet_Our_Missionaries is a solution developed to highlight the missionaries that the church supports. There is a slide for each missionary within this solution.
- To edit one of the solutions, click on the one that needs to be changed. A new window will open. For this example, the Road_Sign solution will be used.
- Once the solution window is open, it will show the first slide of the slideshow. To view all the slides, click on “Page List” tab in the top left of the window. Page List is located below the Save, Save As, and Settings buttons, to the right of the Media List tab.
- The Page List tab will show all the slides that are loaded into the hardware sign controller. The list may be scrolled using your mouse wheel or the scroll bar to the right of the slide list.
- To add a new slide, click the + button at the top of the slide list. It is easiest to start a new blank slide.
NOTE: The new slide will be added below the currently active slide. If there is a specific order you want the slides to appear in, place your new slide according to where you want it to be. You may delete the currently active slide using the red X at the top of the slide list, and you may reorder your slides using the ↑ and ↓ buttons.
NOTE: You may also duplicate an existing slide. The main benefits of duplicating a slide is it copies over the slide timing and the validity period. See step 40 for validity time. If you duplicate an existing slide, you must first delete any existing content on that slide before proceeding to the next step.
- Once your new slide is created, you may add content to the slide using the buttons in the top center of the window. I will not go into detail of what each content button does. You may play around with it to try them out. However, I will cover the most common content we use, graphics, in the subsequent steps.
- Typically, graphics are designed outside of ViPlex Express and then imported into the software. Designing graphics outside of ViPlex Express is actually suggested, as trying to design on the remote computer is cumbersome due to the lag induced from working with high resolution graphics over a remote connection and the fact that ViPlex Express’ design workflow is rudimentary. At this point, it is recommended minimize the remote desktop and design a new graphic using Canva or Inkscape, or import a new graphic generated by someone else. To minimize the remote desktop, move your mouse to the top of the remote desktop screen. A connection status bar will appear. Click the minimize button to minimize the remote desktop.

NOTE: When designing graphics for the digital sign at the road, use a design resolution of 1620 px wide by 1080 px high.
NOTE: When designing graphics for the sign in the hallway, sue a design resolution of 1920 px wide by 1080 px high.
- Once you have your new graphic(s), either maximize the remote connection by clicking the remote desktop icon in the taskbar at the bottom of your screen, or follow steps 18 to 22 if you were disconnected from the remote desktop.

NOTE: If you attempt to reconnect and are unable to, verify you are still connected to the church network (via Wi-Fi, wired network access, or VPN).
- Once you have the remote desktop open again, launch file explorer on the remote computer and navigate to the following folder.
C:\Users\Digital Sign\Documents\Digital Sign Slides
You will see a list of all graphics that are currently available. Copy your new graphic(s) from your computer to the folder listed above.
NOTE: You may use copy and paste between your computer and the remote computer just as you normally would. You may right-click>copy from your computer and right-click>paste into the remote desktop. Ctrl+C and Ctrl+V also work for copying from your computer and pasting to the remote computer.
NOTE: If you have a graphic for the hallway sign, place the graphic in the Hallway Sign folder located with the Digital Sign Slides folder.
- Once you have copied your new graphics to the remote computer, you may navigate back to ViPlex Express and navigate to your new, blank slide, if not already there.
- In the content buttons located in the top center of the window, select the Image button.
NOTE: A box will appear on the blank slide and will say “Please add media.”
- On the right side of the window, a repository will appear with the last folder used. You may navigate to a new folder by clicking on the browse button (outlined in red below), you may go up a directory using the previous folder button (outlined in green below), or you may refresh the current directory using the refresh button (outlined in blue below). You may also enter a folder by single left-clicking folder that appears within your current directory.

NOTE: The last folder used will likely be one of the two folders listed below.
C:\Users\Digital Sign\Documents\Digital Sign Slides
C:\Users\Digital Sign\Documents\Digital Sign Slides\Hallway Sign
- Once you are in the correct media repository within ViPlex Express, scroll down the graphics and find your new one.
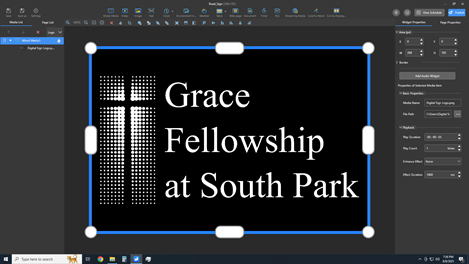
- Single left-click your new graphic to add it to the slide.
NOTE: The graphic should automatically “stretch to fill” within the slide. If properly designed, there will be no stretch to the graphic. If a design resolution other than what is listed in step 30 is used, the graphic may have some stretch to it.
- Once your new graphics is added to the slide, click the save button in the top left corner of the window.
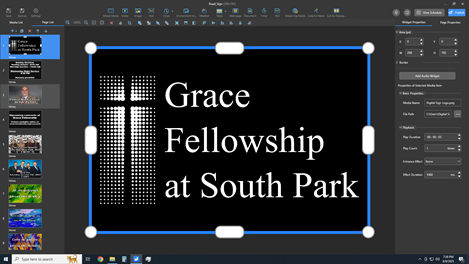
- To edit the duration that the graphic will show on the sign, you must first click onto a different slide within the slide list on the left side of the window, click back on to the new slide, and single left-click the new graphic. Once you single left-click, the active tab in the top right should say Widget Properties. To edit the slide duration, change the Play Duration field. The format is DD:MM:SS. The ViPlex Express default is 10 seconds. The most used duration is 5 seconds (00:00:05).
NOTE: Entering 5 seconds into the duration field can be tricky. The user interface design for that field is very poor. Just be patient and take your time figuring out how to enter it.
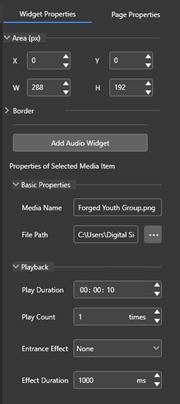
- The slide validity is the time frame that the slide will be in rotation on the sign. Checking the box next to Validity Range will allow you to schedule a calendar day for the slide to be added to the rotation and the last day the slide will be in rotation.
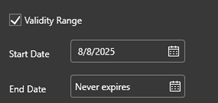
NOTE: ViPlex Express will give an error if you, accidently or intentionally, set the End Date before the Start Date. If you have duplicated a slide and are editing the validity range, edit the End Date first. If you edit the Start Date first and select a date after the End Date from the original slide, it will give you an error and you will have to click through the little selection calendar again to find your start date.
NOTE: The End Date is a “good through” date, meaning the slide will continue to run through the date entered in the End Date. For example, if you enter 12/25/2025 in the End Date, the slide will continue to show all day on 12/25/2025 and will drop out of the slide rotation starting at 12:00 AM on 12/26/2025.
NOTE: If you enter an end date and decide it should never expire, click the X button that appears in the End Date field.
NOTE: Click Save in the top left to save changes for the validity period for your new slide.
- The slide schedule is the timeframe, within a 24 hour day, that the slide will appear on the sign. The start and end times are in 24 hr format (HH:MM).
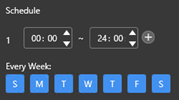
NOTE: The “Every Week” selection allows you to pick which days of the week you want the slide to run given the time schedule in that section. Days that are highlighted blue are the active days.
NOTE: You may create more than one schedule for a slide. To add a new schedule, click the + button to the right of the end time. For example, the schedule below is set up to show the slide Monday through Friday from 5:30 AM to 9:00 AM each day, Saturday through Sunday from 6:00 AM to 10:30 AM each day, and it shows the slide a second time on Wednesdays from 5:00 PM to 9:00 PM. This section is highly customizable.
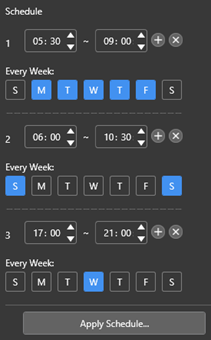
NOTE: If you set up a schedule for your new slide and want to copy that schedule to another slide, or slides, click the Apple Schedule button and a window will appear and allow you to select which slides to copy the schedule to.
NOTE: Click Save in the top left to save changes for the schedule for your new slide.
- Once the graphic is loaded, the validity period is set, and the schedule is set, save your changes using the Save button in the top left of the window.
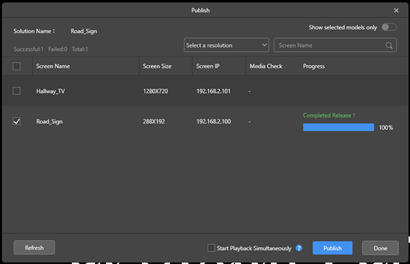
- Publish the updated slideshow to the sign using the blue Publish button at the top right of the screen.
- Once you click the publish button, ViPlex Express with do a secondary save and then load the available screens into the Publish window for you to select which screen you want to publish to.
- Click the checkbox next to the sign you want to update.
CAUTION: You should never publish the same content to both the Hallway_TV sign and the Road_Sign sign. They have two different resolutions and one of them will look bad if you publish the same content to both. Ensure you are publishing the correct sign.
- Once you have clicked the checkbox for the correct sign, click the publish button at the bottom of the Publish window. A blue progress bar will appear next to the sign you are publishing to.

- Once published, the progress bar will say 100% and “Completed Release !” will appear above the progress bar. Click the Done button in the bottom right of the Publish window once the publishing is complete.
- Click the X at the very top right of the screen to close the solution window and return to the main ViPlex Express window.
- You have now successfully updated the digital sign. You may leave open the ViPlex Express main window and exit out of the remote desktop.
NOTE: To exit the remote desktop, move your cursor to the top of the remote desktop window and the remote desktop bar should drop down from the top. Click the X to exit. You will receive a prompt to confirm you want to disconnect your remote session. Click OK to confirm.

NOTE: Please disconnect from the church’s LAN after you have finished updating the sign and have disconnected from the remote desktop. Steps 10 to 13 provide instructions for disconnecting from the church’s LAN.
https://openvpn.net/client/
NOTE: If the URL for OpenVPN Connect has changed, you may search online to find the new URL or obtain the installation file for OpenVPN Connect by accessing the following Google Drive location on the admin account.
(Windows) My Drive>Information Technology (IT)>openvpn-connect-3.7.3.4351_signed.msi
(MacOS) My Drive>Information Technology (IT)>openvpn-connect-3.7.1.5558_signed.dmg
My Drive>Information Technology (IT)>Grace Fellowship LAN.ovpn
NOTE: If the file has moved, search the entirety of the admin account Google Drive for “.ovpn”. If the file is still available, it will show up in the search results.
NOTE: If the church is experiencing a power outage or an internet outage, you will be unable to connect via VPN.
NOTE: Steps 10 to 13 provide instructions for disconnecting from the church’s LAN.
NOTE: Steps 14 to 17 provide instructions for reconnecting to the church LAN for subsequent connections.
NOTE: Steps 18 to 49 provide instructions for editing the slides on the digital sign.
NOTE: To reconnect to the church LAN, follow steps 14 to 17 for subsequent connections.
NOTE: Steps 10 to 13 provide instructions for disconnecting from the church’s LAN.
NOTE: Steps 14 to 17 provide instructions for reconnecting to the church LAN for subsequent connections.
NOTE: Steps 18 to 49 provide instructions for editing the slides on the digital sign.
NOTE: Steps 18 to 49 must be completed while connected to the church’s LAN. You may connect via VPN as described in steps 14 to 17 or you may physically be within the church building and on a computer connected to the church Wi-Fi or wired LAN. If you are physically in the church and connected to the network, you do not need to follow steps 14 to 17 to connect to the church VPN. You may proceed with these steps.
Computer: 192.168.2.175
User name: Digital Sign
If you would like to save these settings and create a shortcut so you don’t have to enter this info every time, check the box that says “Allow me to save credentials”. Once checked, click Save As… to save an .rdp file to your computer. You may place the resultant file anywhere that is convenient on the computer. Once saved, you will be back at the RDC window.
NOTE: The computer used to control the digital sign has an IP address reservation within the router’s DHCP server. This address should not change unless the network router is changed.
NOTE: There are additional settings you may configure for the remote desktop connection in the other tabs (Display, Local Resources, Experience, Advanced). You may configure these as you wish. However, you must configure the settings in the other tabs prior to saving the .rdp file or your settings will not be saved. If you save your .rdp file before configuring the other tabs, you may Save As again and overwrite your original .rdp file.
Password: Grace2024!
NOTE: ViPlex Express requires administrator privileges to run. If you are accessing the computer after it has restarted or recovered from a power failure, the computer will launch ViPlex Express and you will have to allow the software to run via a prompt asking for admin permission. The software is unsigned – the computer will flag the software as a security risk, but you are okay to proceed and approve the permission request.
NOTE: The computer is set to automatically turn on after a power failure and subsequent power recovery. If the church has power, the computer should be accessible (assuming there isn’t an internet outage).
NOTE: If ViPlex Express was launched during login, it will automatically go to the Screens tab. If the software was already open, it may be on the Screens tab or it may be on one of the other tabs.
NOTE: The Screens tab will show you the available signs. There are two options at the time of writing. The Hallway_TV is the TV mounted above the bulletin board outside the church office. The Road_Sign is the digital sign at the road. Both hardware sign controllers are connected via hardwired ethernet. If the dot next to the signs are green, it means the controller software on the computer is connected to the hardware sign controller. If either of the dots is yellow, hovering over the row will reveal a button on the right side of the row that says “Connect”. Clicking that button will reconnect the sign. No password should be required as that is saved within the ViPlex Express software.
Hallway_TV_Default is the solution used when general info is shown on the hallway TV such as upcoming church events (both public and private) and church announcements.
Road_Sign is the default solution for the road sign and is used to show general info about the church and upcoming public events.
Road_Sign_Special is the solution used when special slides have been created for special events, holidays, or other occasions. There are typically only one or two slides contained within this solution.
Hallway_TV_Special is the solution used to show slides for special events and specific announcements. There are typically only one or two slides contained within this solution.
Meet_Our_Missionaries is a solution developed to highlight the missionaries that the church supports. There is a slide for each missionary within this solution.
NOTE: The new slide will be added below the currently active slide. If there is a specific order you want the slides to appear in, place your new slide according to where you want it to be. You may delete the currently active slide using the red X at the top of the slide list, and you may reorder your slides using the ↑ and ↓ buttons.
NOTE: You may also duplicate an existing slide. The main benefits of duplicating a slide is it copies over the slide timing and the validity period. See step 40 for validity time. If you duplicate an existing slide, you must first delete any existing content on that slide before proceeding to the next step.
NOTE: When designing graphics for the digital sign at the road, use a design resolution of 1620 px wide by 1080 px high.
NOTE: When designing graphics for the sign in the hallway, sue a design resolution of 1920 px wide by 1080 px high.
NOTE: If you attempt to reconnect and are unable to, verify you are still connected to the church network (via Wi-Fi, wired network access, or VPN).
C:\Users\Digital Sign\Documents\Digital Sign Slides
You will see a list of all graphics that are currently available. Copy your new graphic(s) from your computer to the folder listed above.
NOTE: You may use copy and paste between your computer and the remote computer just as you normally would. You may right-click>copy from your computer and right-click>paste into the remote desktop. Ctrl+C and Ctrl+V also work for copying from your computer and pasting to the remote computer.
NOTE: If you have a graphic for the hallway sign, place the graphic in the Hallway Sign folder located with the Digital Sign Slides folder.
NOTE: A box will appear on the blank slide and will say “Please add media.”
NOTE: The last folder used will likely be one of the two folders listed below.
C:\Users\Digital Sign\Documents\Digital Sign Slides
C:\Users\Digital Sign\Documents\Digital Sign Slides\Hallway Sign
NOTE: The graphic should automatically “stretch to fill” within the slide. If properly designed, there will be no stretch to the graphic. If a design resolution other than what is listed in step 30 is used, the graphic may have some stretch to it.
NOTE: Entering 5 seconds into the duration field can be tricky. The user interface design for that field is very poor. Just be patient and take your time figuring out how to enter it.
NOTE: ViPlex Express will give an error if you, accidently or intentionally, set the End Date before the Start Date. If you have duplicated a slide and are editing the validity range, edit the End Date first. If you edit the Start Date first and select a date after the End Date from the original slide, it will give you an error and you will have to click through the little selection calendar again to find your start date.
NOTE: The End Date is a “good through” date, meaning the slide will continue to run through the date entered in the End Date. For example, if you enter 12/25/2025 in the End Date, the slide will continue to show all day on 12/25/2025 and will drop out of the slide rotation starting at 12:00 AM on 12/26/2025.
NOTE: If you enter an end date and decide it should never expire, click the X button that appears in the End Date field.
NOTE: Click Save in the top left to save changes for the validity period for your new slide.
NOTE: The “Every Week” selection allows you to pick which days of the week you want the slide to run given the time schedule in that section. Days that are highlighted blue are the active days.
NOTE: You may create more than one schedule for a slide. To add a new schedule, click the + button to the right of the end time. For example, the schedule below is set up to show the slide Monday through Friday from 5:30 AM to 9:00 AM each day, Saturday through Sunday from 6:00 AM to 10:30 AM each day, and it shows the slide a second time on Wednesdays from 5:00 PM to 9:00 PM. This section is highly customizable.
NOTE: If you set up a schedule for your new slide and want to copy that schedule to another slide, or slides, click the Apple Schedule button and a window will appear and allow you to select which slides to copy the schedule to.
NOTE: Click Save in the top left to save changes for the schedule for your new slide.
CAUTION: You should never publish the same content to both the Hallway_TV sign and the Road_Sign sign. They have two different resolutions and one of them will look bad if you publish the same content to both. Ensure you are publishing the correct sign.
NOTE: To exit the remote desktop, move your cursor to the top of the remote desktop window and the remote desktop bar should drop down from the top. Click the X to exit. You will receive a prompt to confirm you want to disconnect your remote session. Click OK to confirm.
NOTE: Please disconnect from the church’s LAN after you have finished updating the sign and have disconnected from the remote desktop. Steps 10 to 13 provide instructions for disconnecting from the church’s LAN.